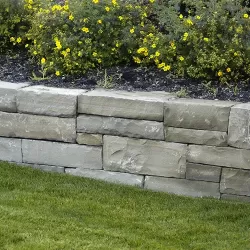
Retaining walls in your front or backyard don't have to be mortared cinder blocks, for example. Using chopped stone as an alternative gives the yard more modern and contemporary look that's unmatched anywhere else. Learn how to use chopped stones from KK Ranch Stone & Gravel to build a safe, retaining wall right now.
1. Organize the Stones
Chopped stone has irregular shapes that add character to any retaining wall. To start out the project, organize the stones by size.
The wall's base must be made from the large stones so that the weight can be distributed in an even manner. In fact, you want the stones to practically lock together as a cohesive unit at the base only. Lay out the stones on the ground first in order to create a mock wall. They'll be easier to lay out at your final wall location when you know which pieces will work at the base.
2. Prepare the Base
Use a straight-edge spade to carve out a trench where the wall will reside. Ideally, cut about 4-inches deep into the ground with a 2-foot width for the entire project. This design strategy allows you to build a retaining wall to an 18- or 22-inch height. Avoid building the wall any higher without engineering expertise and mortar.
Compact the ground as you refine the trench's shape. If you're concerned about drainage in this area, adding a fine layer of gravel is a good course of action.
Use a level to verify that the trench is perfectly flat for the future wall layers.
3. Line Up the Stones
Set the base layer into the trench in the same formation as you arranged it earlier.
Follow these steps:
- Place the first stone down and slightly rock it into the ground.
- Verify that the stone is securely set into place by testing its stability with your hand.
- Set the next stone next to the first one and repeat the rocking action.
Continue these actions until you've filled the 2-foot-wide trench with chopped stone. The rocking action allows the soil to move between the stone gaps, which forms a mortar-like glue for your wall.
4. Fill in the Backside Gaps
Your base has a solid foundation, but it'll need more support than just the soil below it. Use the spade to push more soil behind the first layer where the wall's backside will reside. Use a rubber mallet against the stones to further solidify the base to the backfilled soil.
Verify that the base is ready for another layer by walking on them. Feel the stability below your feet. If there's any wobbly sensation, continue to fill in the area with more soil.
5. Build up the Levels
Getting the first course flat and level is extremely important, so take your time. Try to lay the course as close to the center of the trench as possible.
Make sure to lay the stones so that they angle in slightly toward the back of the wall. This will help the wall resist the pressure of the backfill (ground soil behind the wall). Arrange the second layer so that no stones have a connecting joint to the layer below. Complete this layer, and fill in the backside with soil as you go.
Continue to stack the stones until you're almost at the last layer. The overall appearance should have some small crevices where you can plant a few seeds if desired. It's entirely unique to your stacking strategy.
6. Cap Off the Top
Choose larger, chopped stone for the top layer. The capstone is usually made of flat stones if you want to sit down on the wall. Because you're doing it yourself using chopped stones from KK Ranch Stone and Gravel, you can create a more rustic look or modern feel to your stone wall.
Make the capstone as level as possible with your large stones. Fill the gaps with soil on the backside. The hillside soil and wall become one with these final steps. You might also consider adding soil to the gaps on top of the capstone. Gardeners often add seeds in these areas so that the wall has a living aspect to its features. It also adds another layer of stability.
For high-quality chopped stone, KK Ranch Stone & Gravel is ready to deliver your first load . Every guillotine-chopped section is solid and distinct in its appearance. With this project completed over a weekend, a chopped-stone retaining wall can stand the test of time.